- Dettagli
- Read Time: 4 mins
13.5 Piante, alberi e campi
Le piante sono elementi che crescono nel tempo, passando attraverso le fasi di vuoto, nuovo, crescita e maturità (e anche morte). Hanno bisogno di acqua per crescere e possono essere accelerate dall'applicazione di concime. In genere, le piante sono oggetti come alberi, campi, fioriere, ecc. ma possono essere utilizzate anche per gli animali e altri oggetti! Le piante producono un singolo raccolto, ma possono anche essere configurate per produrre sottoprodotti come legno, foglie, rami, radici ecc.
L'aspetto della pianta durante le varie fasi può essere controllato da diverse texture o da primitivi.
Le piante primarie e i sottoprodotti sono nuove caratteristiche non presenti nelle versioni precedenti del sistema.
(a) Piante basate su texture
Sono costituite dalla prim del contenuto e da una prim denominata Fogliame. Si possono avere anche altri prim per il terreno, i tronchi, ecc.
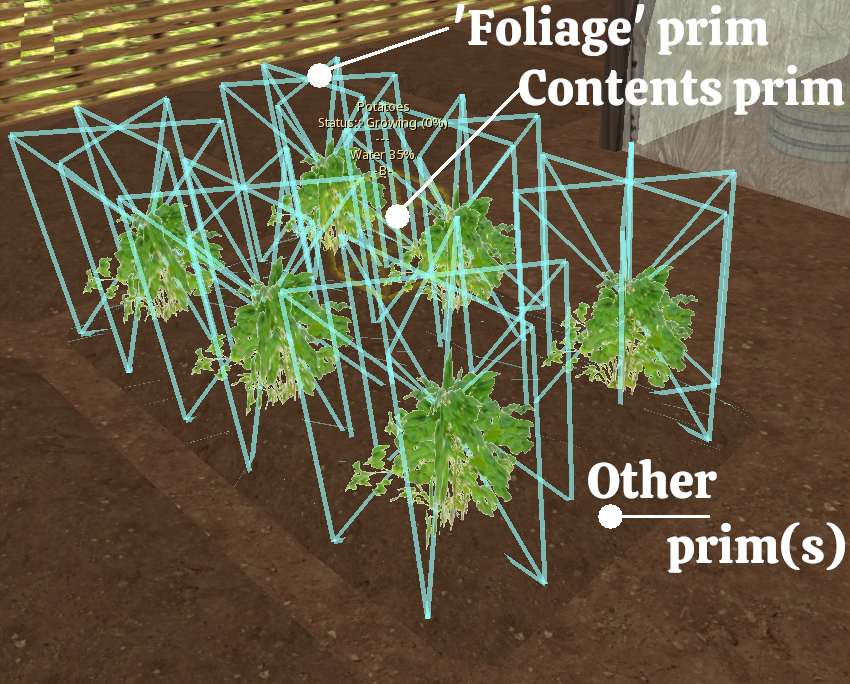
Quando non viene piantato nulla, la primitiva Fogliame è impostata al 100% di trasparenza, poi durante ogni fase di crescita, al posto della trasparenza, viene applicata una texture alla primitiva che corrisponde alla fase di crescita. Ad esempio, se la coltura è una lattuga, le texture utilizzate si chiameranno Lattuga-nuova, Lattuga-crescita e Lattuga-matura (notare che la maiuscola è importante).
Aggiunta di una nuova coltura a una pianta esistente
Si noti che il numero massimo di piante in qualsiasi oggetto (albero, campo, fioriera ecc.) è 11, quindi inizieremo con il campo SF Small Field e lo trasformeremo in un nuovo oggetto che chiameremo SF Vegetable Field e aggiungeremo il cavolo come nuova coltura.
Per prima cosa rinominiamo il campo SF Small Field in SF Vegetable Field e rimuoviamo alcune delle colture esistenti per far posto al nostro nuovo campo (dato che si tratterà di un campo di ortaggi, eliminiamo Pot, Strawberries, Sugar Cane e Tea) cancellando dal contenuto:
SF Pot, SF Strawberries, SF Sugar Cane, SF Tea
Pot-New, Pot-Growing, Pot-Ripe
Strawberries-New, Strawberries-Growing, Strawberries-Ripe
Sugar Cane-New, Sugar Cane-Growing, Sugar Cane-Ripe
Tea-New, Tea-Growing, Tea-Ripe
Dobbiamo anche rimuovere questi elementi dalla scheda di configurazione e a questo punto possiamo aggiungere anche il cavolo:
# Elenco dei nomi delle piante disponibili (senza prefisso SF) PLANTLIST=Aubergines,Cabbage,Carrots,Lettuce,Onions,Peppers,Potatoes,Tomatoes # Elenco dei prodotti corrispondenti PRODUCTLIST=SF Aubergines,SF Cabbage,SF Carrots,SF Lettuce,SF Onions,SF Peppers,SF Potatoes, SF Tomatoes
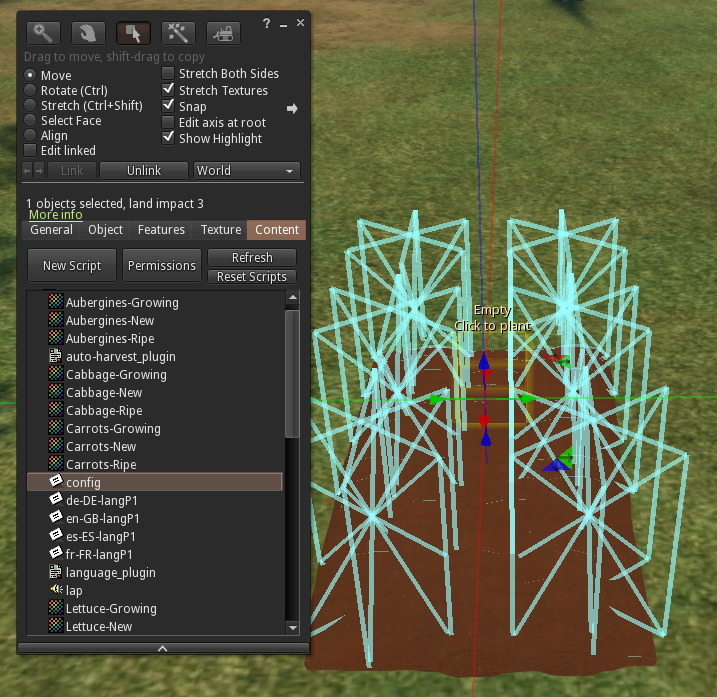
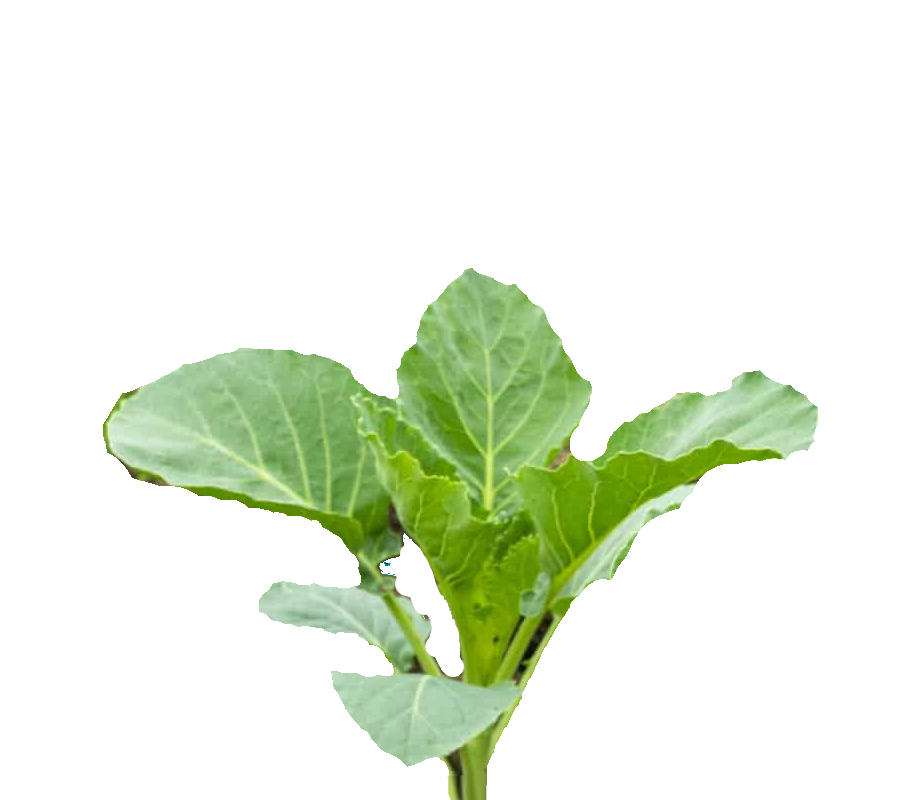
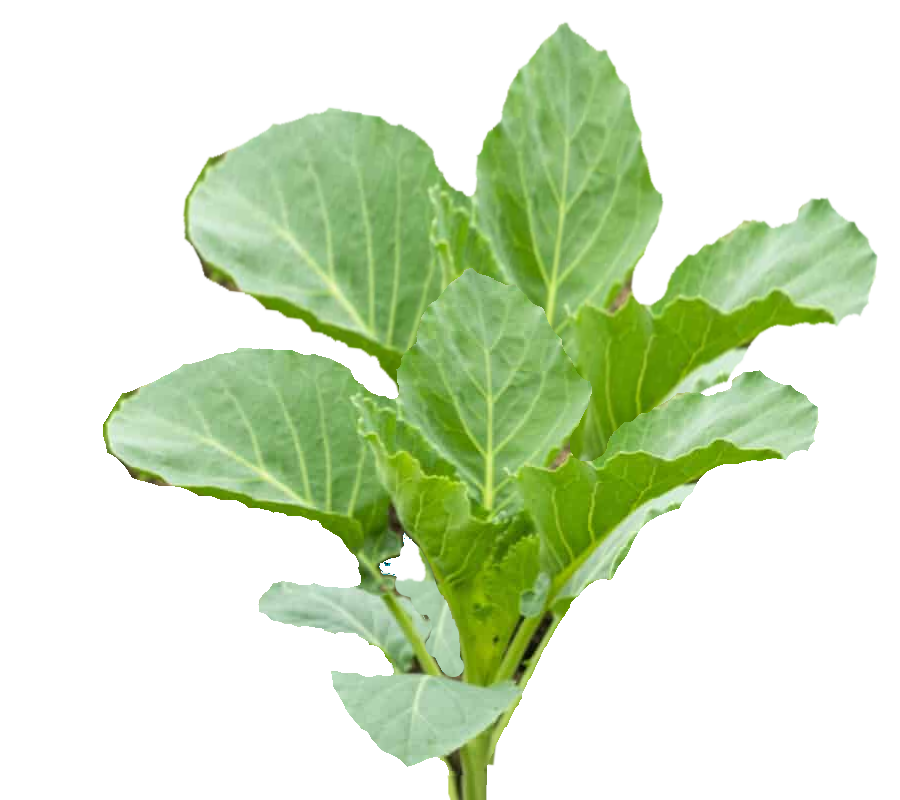
Ora siamo pronti per aggiungere la nostra pianta di cavolo e il raccolto. Per aggiungerlo abbiamo bisogno di tre texture e di un prodotto. Le texture devono avere un nome che corrisponda alla voce della PLANTLIST e che sia seguito da -New, -Growing, -Ripe, quindi in questo caso saranno Cabbage-New, Cabbage-Growing, Cabbage-Ripe Il nostro prodotto (l'oggetto che viene rezzato quando si raccoglie) è SF Cabbage
Per la creazione del prodotto, fare riferimento a questa sezione della guida. Un modo semplice per creare un nuovo prodotto è quello di utilizzare uno dei secchi di raccolto esistenti e cambiare il nome e la texture nel secchio, ma naturalmente potete creare il prodotto come preferite!
Per la creazione di texture, questa può essere spesso la parte più difficile della creazione di una nuova pianta, soprattutto se si fa attenzione a lavorare solo con immagini di pubblico dominio per evitare di violare il copyright! Siti web come https://www.textures.com e http://texturer.com possono essere utili.
È meglio che le tre immagini abbiano tutte le stesse dimensioni, in modo da poterle scalare al meglio. Le immagini devono utilizzare la trasparenza, quindi è necessario salvarle come file PNG anziché JPG.
 |
 |
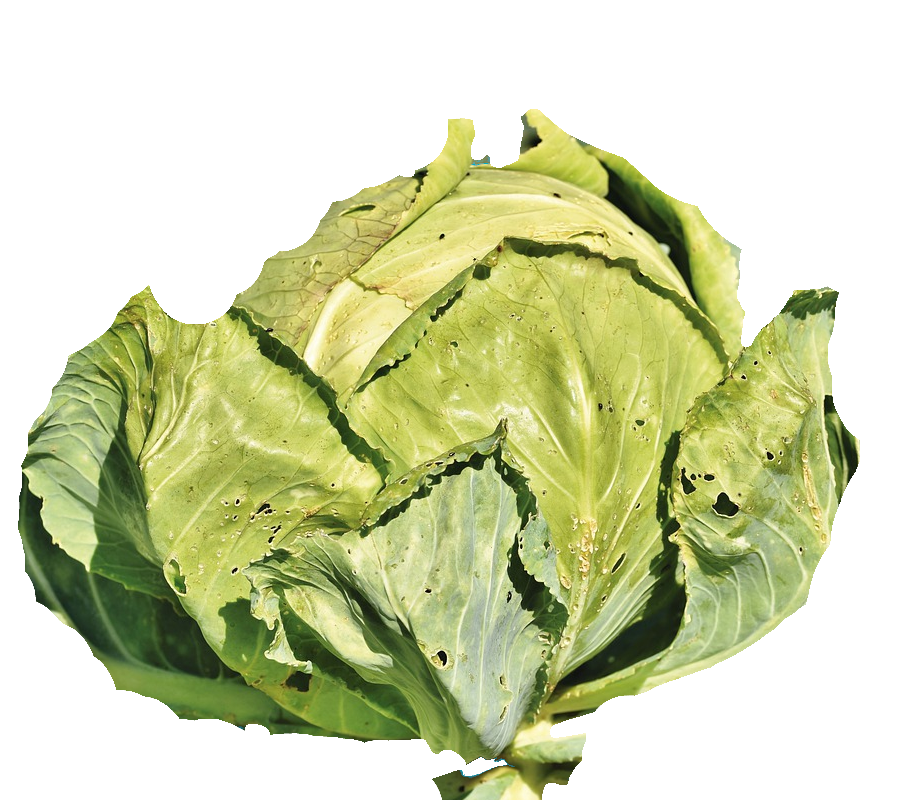 |
| Texture Cavolo nuovo | Texture Cavolo in crescita | Cavolo maturo |
Il nostro cavolo SF (mesh)
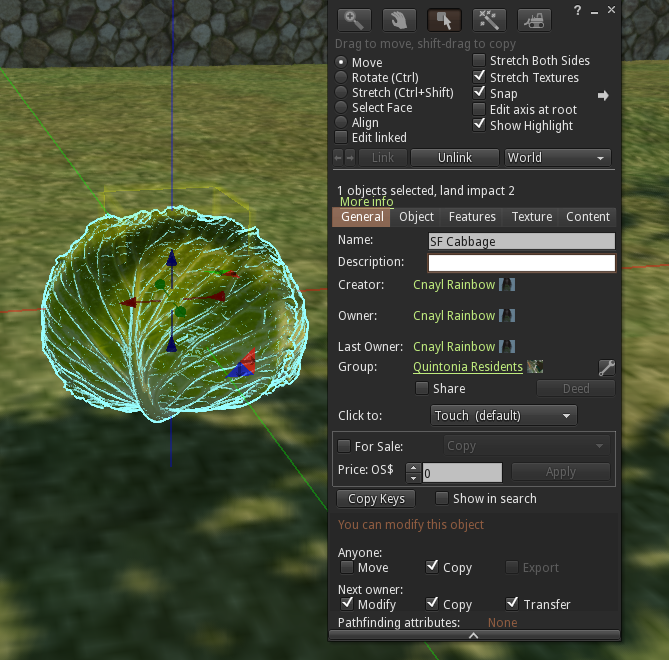
Aggiungiamo le tre texture e il cavolo SF al contenuto dei campi e, per essere sicuri che tutto sia pronto, cancelliamo il testo del campo Descrizione e facciamo un Reset Scripts.
Ora dovremmo avere un campo vuoto pronto per il test. Fare clic sul campo e selezionare il pulsante Plant: si spera di vedere Cabbage tra le opzioni. In caso contrario, ricontrollare la scheda di configurazione.
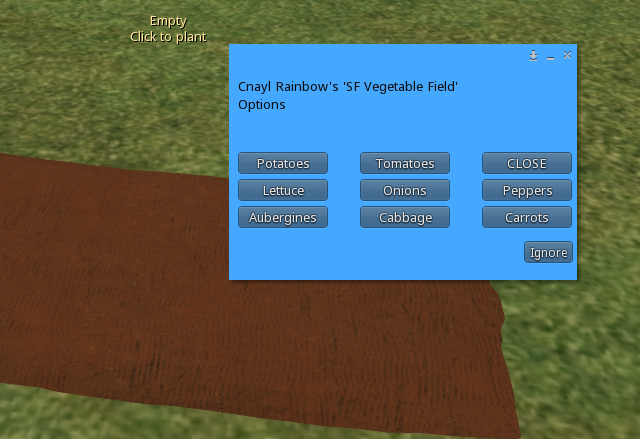
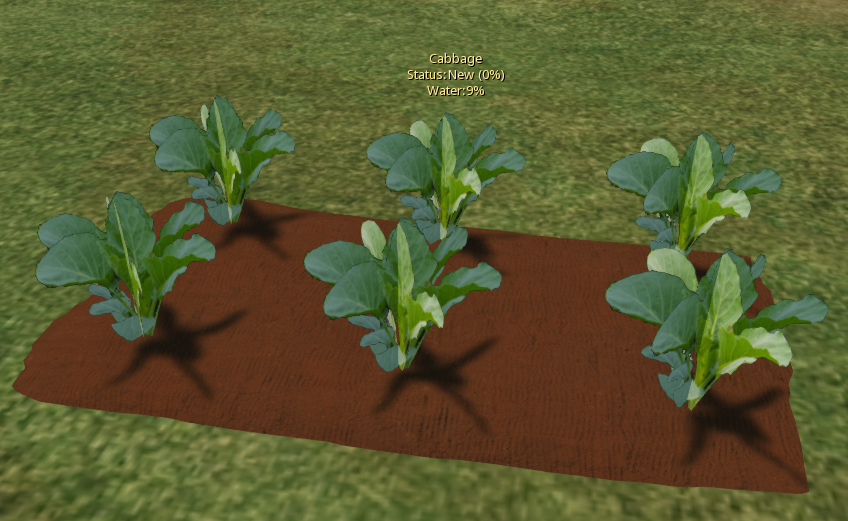 Selezionate per piantare il nuovo elemento (in questo caso, il cavolo) e potrete vedere come appare nella fase 'Nuovo'.

Se non vedete la texture della pianta, controllate il nome delle texture. È importante che seguano le maiuscole/minuscole corrette. Se, ad esempio, avessimo chiamato la texture Cavolo-nuovo o Cavolo-nuovo o Cavolo-nuovo, ecc.
Per vedere come appare la pianta nelle fasi di crescita e maturazione, invece di dover aspettare, possiamo usare un 'trucco' per procedere rapidamente!
Modificate il campo e nella descrizione dovreste vedere scritto qualcosa come
T;SF Cabbage;New;56700;9;2;Cabbage;-1987831;0;en-GB
Tutto quello che dovete fare è cambiare la parola New in Growing e poi reimpostare gli script e la pianta passerà allo stadio di crescita dopo uno o due secondi.
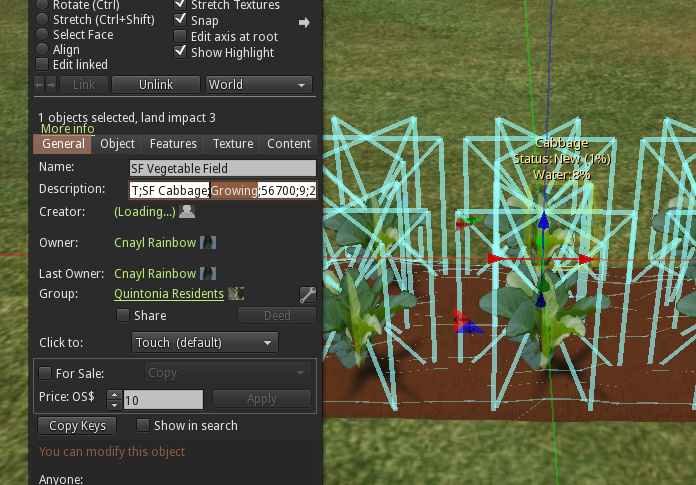
Ripetete quanto detto sopra, ma questa volta cambiate Crescita con Maturazione e quando resetterete gli script la pianta passerà allo stadio di maturazione.
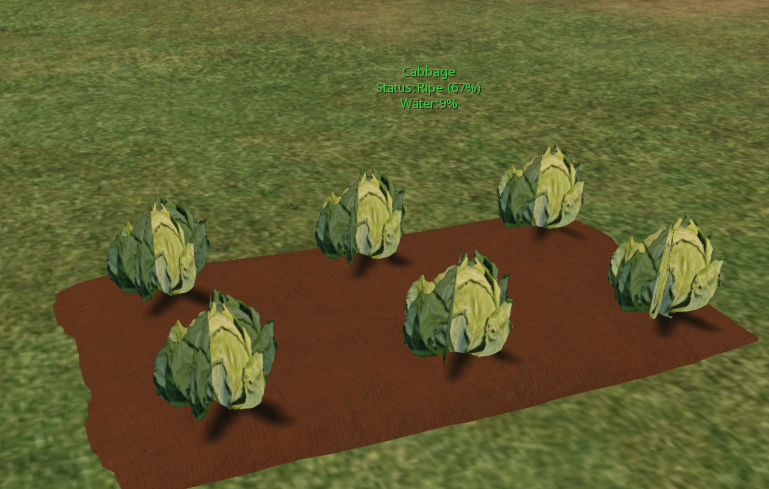
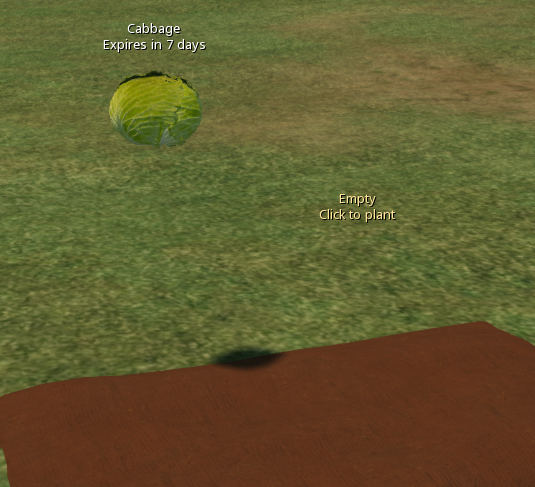
Infine, si può fare clic su Raccogli per verificare che la nuova coltura sia stata riorganizzata correttamente e che il campo torni a essere Vuoto.

Questo lavoro di Buzzy Cnayl è rilasciato sotto licenzaCreative Commons Attribuzione-Non commerciale-Condividi allo stesso modo 4.0 Internazionale.
Basato su un lavoro dihttps://satyrfarm.github.io/
- Dettagli
- Read Time: 8 mins
13.4 Machines
Machines are the items that allow you to make things. They come in many forms but essentially they all take in one or more products as ingredients to produce one or more products as their output. Machines can either run on their own or require you to ‘sit’ at them to make the item.
An easy way to make a new machine is to start with one of the existing ones – we will use the SatyrFarm Kitchen. If you rez one out and then start editing it, you will see that it contains an ‘invisible prim’. Machines show things like progress, the list of required ingredients etc. as float text over the root prim, so often an invisible prim is used to ensure that text appears in an easy to see place.
To make our new machine we can simply unlink the root prim from the SatyrFarm Kitchen and use that as our starting point (you may want to set the texture to blank/default before unlinking so you can see it!)
Once we have done that we can delete the rest of the SatyrFarm kitchen.
Machines contain the following items:
Config notecard – this is the configuration for the machine
Recipe notecards – there is a master notecard plus one for user added recipes. The recipes tell the machine how to make things.
Product – the product that the machine makes must be available in the machines contents (although the machine will call out via ‘share mode’ to storage units in the region to try and find a missing product – see storage in section 13.2)
Textures (optional) – there can be one or more prims that show a texture when the machine is operating.
Scripts – more information on the scripts can be found in chapter Chapter 14
Let’s make a new machine using the prim we have just separated.
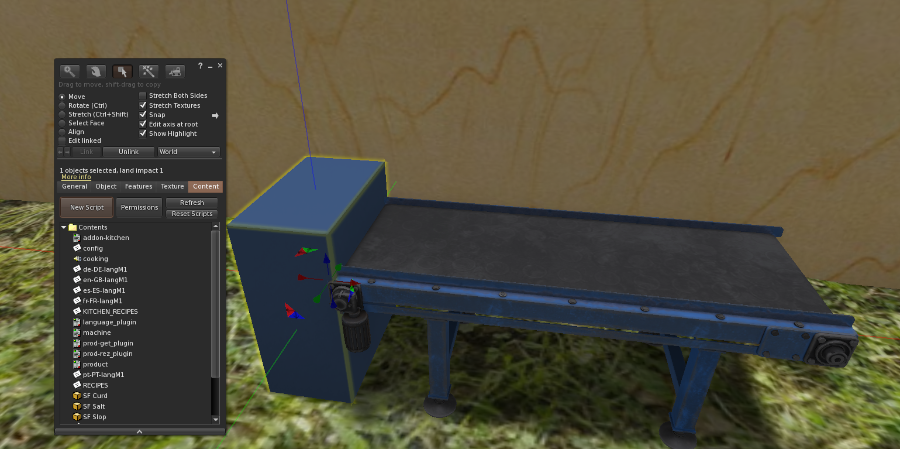
Here we have resized the prim, changed the colour and put it next to the object we are using for our new machine. All we need to do is select the new object then shift click on the ‘machine prim and link them:
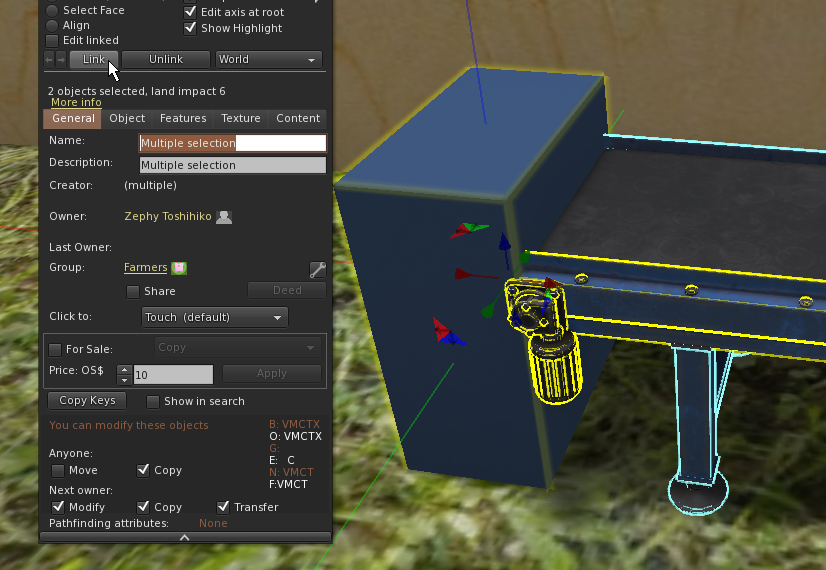
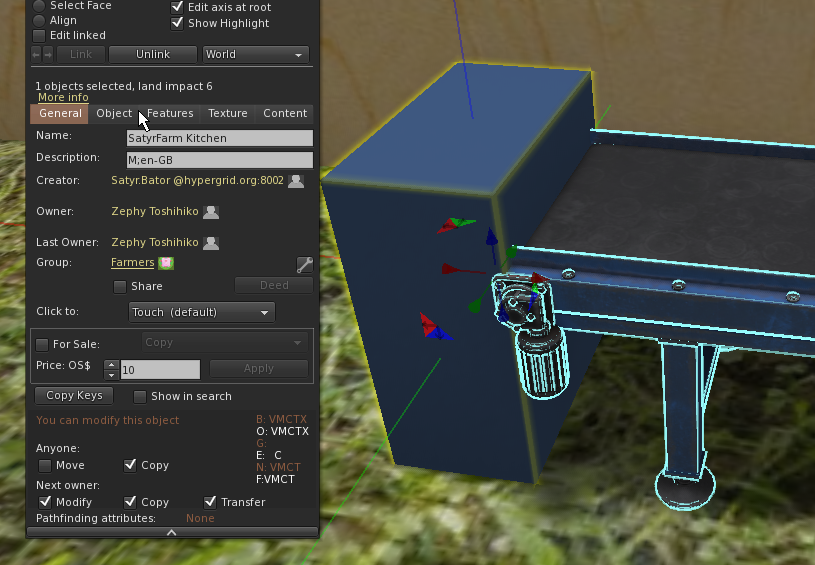
After we link we should see the new object has the prim we took off the other machine now set as the root prim for our new machine - it still has the name from that previous machine, so we can change that.
N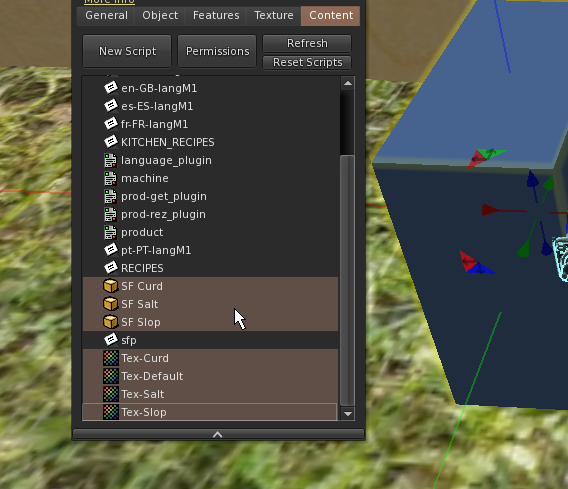 ow take a look in the contents where you will see various products and as we don’t want our new machine to make any of these we can delete them and also their associated textures and add in one or more products that we want the machine to be able to make. We also need to modify the recipe card for our new product(s).
Before we do that though we should edit the confignotecard to check/adjust three key settings. First we can choose if the machine requires you to sit at it in order for it to operate. For our machine we don’t require that so we set the MUST_SIT option to 0:
# Set to 1 if avatar must sit and stay to produce item
MUST_SIT=0
Next we can choose if people will ‘make’ or ‘do’ – you might make a widget or do some washing for example:
# Set to 1 to use 'make' or 0 to use 'do'
MAKE_VERB=1
Lastly we need to set up the R Code used for the main recipe notecard. This is a feature that allows the machine to integrate with the Quintonia server to share and allow for updating recipes. Since we are calling this machine the ‘SF Widget Maker’ we could pick WIDGET for our machine:
# (Optional) Recipe code when using networked recipe cards
RCODE=WIDGET
Now we can rename the recipe notecard so that it is the R Code followed by ‘_RECIPES’ i.e. WIDGET_RECIPES
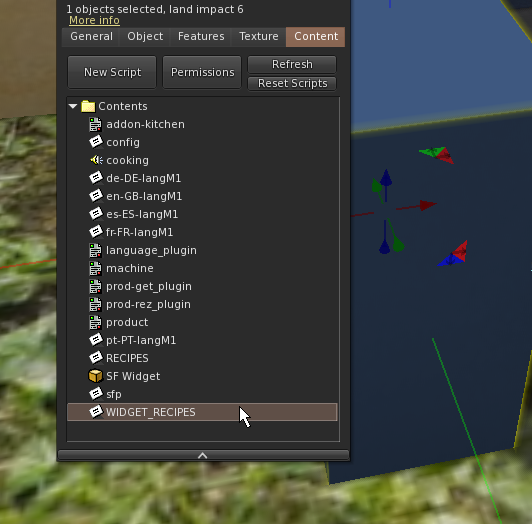
We can now edit the notecard to set up one or more recipes.
(a) Recipes
To create a recipe, you just need to add a line in the RECIPES notecard inside any food-processing object like the Kitchen, Juicer, microbrewery etc. The notecard first starts with the version in the format @VER=n where n is an integer:
@VER=1
Then you put the text that will be shown on the menu (in the selection screen) inside square brackets. For this recipe you want to display it as ‘Widget’ so put [Widget]:
[Widget]
Then you specify how long (in seconds) it takes to make the item:
DURATION=120
Next you list the ingredients required to make the item. In the ingredients list you have the option to indicate percentages and also give a choice of items. So if you only need to use half a bucket of ‘SF Aluminium’ and could use either SF Wood or SF kWh it would be written as:
INGREDIENTS=50% Aluminium, Wood or kWh
Note that you should not include the ‘SF’ part in the ingredients list. When using a percentage and a choice you need to put the percentage for both items (and they can be different) e.g. ‘50% Wood or 50% kWh’
Now you specify what product is made. This does need to be the full name including the SF part if it is part of the product name.
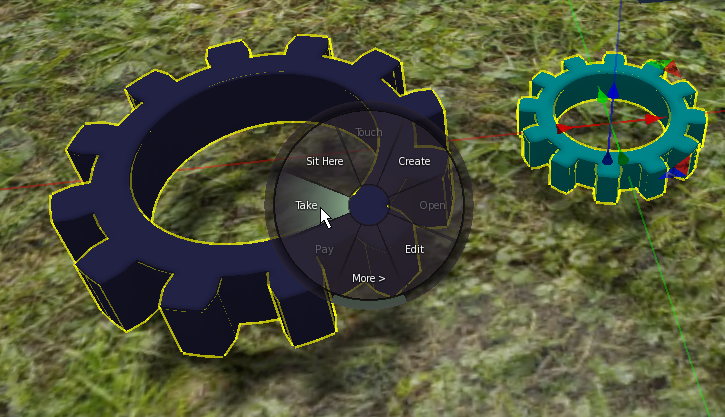
Note that you can only put the name of one thing here but if you wish your machine to make more than one item then you can achieve that by using coalesced objects (sometimes called a combined object) Rez the items you wish to use as the ‘product – in this case we have an ‘SF Cog’ and an ‘SF Gear’ so we select one to edit and then we shift select the second object.
Now from the right menu click do a ‘Take’ and you will get this coalesced object in your inventory. Rename it to something unique (you don’t need the SF part)
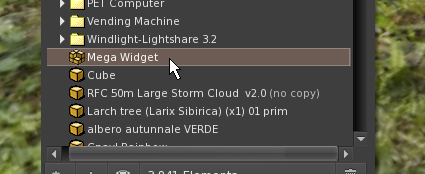
PRODUCT=Mega Widget
There are a few other options you can use in the recipe and they are covered in section 14.1 You can also add comments by starting the line with # and use spacing to make it clearer to read.
You can then repeat the above to add more recipes. The end of recipes is marked by [END]
[END]
For this example the recipe notecard will be:
@VER=1
#
[Widget]
    DURATION=120
    INGREDIENTS=50% Aluminium, Wood or kWh
    PRODUCT=Mega Widget
[END]
(b) Extra features
Visibility
If you name one or more of the prims show_while_cooking those primes will be shown (alpha 0%) during cooking only, and hidden afterwards. You can set an arbitrary alpha level for the link like 0.5 by naming it show_while_cooking 0.5
Rotation
If you name any of the prims in the spin <0,2.0,0> they will spin in the specified vector local axis with a spin rate of 2 whilst the cooking task is active. You can change the vector to point to the direction and spin rate that you wish.
Extra features
If you plan to create more complex functionality you should add an addon script to the processor. Do not modify the main script as your changes will be overwritten in the next release of the farm. The machine script sends a number of link_messages when actions happen. Search the machine.lsl script for llMessageLinked lines to see those messages and use them in your addon.

This work by Buzzy Cnayl is licensed under a Creative Commons Attribution-NonCommercial-ShareAlike 4.0 International License.
Based on a work at https://satyrfarm.github.io/
- Dettagli
- Read Time: 5 mins
13.3 Products
Turning objects in products is a relatively simple process. First you will need to check the orientation of the object as when any product is rezzed (from storage, machine etc.) it is always rezzed with a rotation of <0, 0, 0> which may not be the way we expect it to look.
As an example look at this barrel object:
W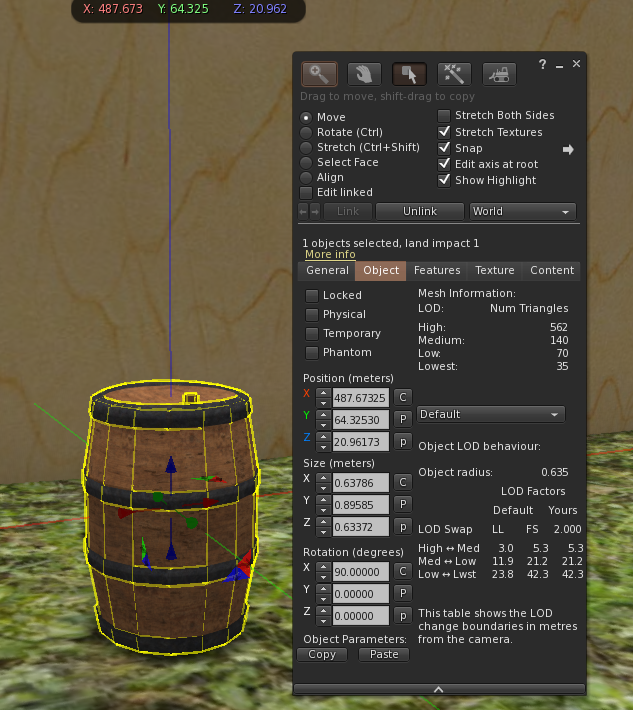 e would like it to be standing this way up when rezzed, but if we check we can see the the rotation x value is 90°
Setting the rotation to <0, 0, 0> gives us the barrel laying down so this is how it will appear when rezzed.
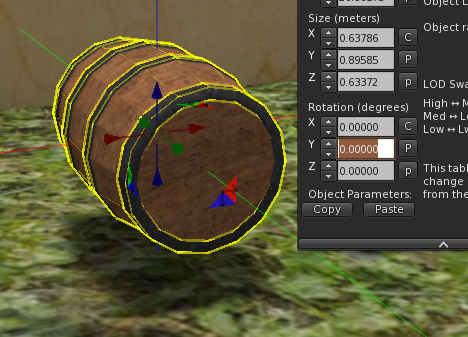
To fix this we need to ensure that the root prim is set to the zero rotation position.
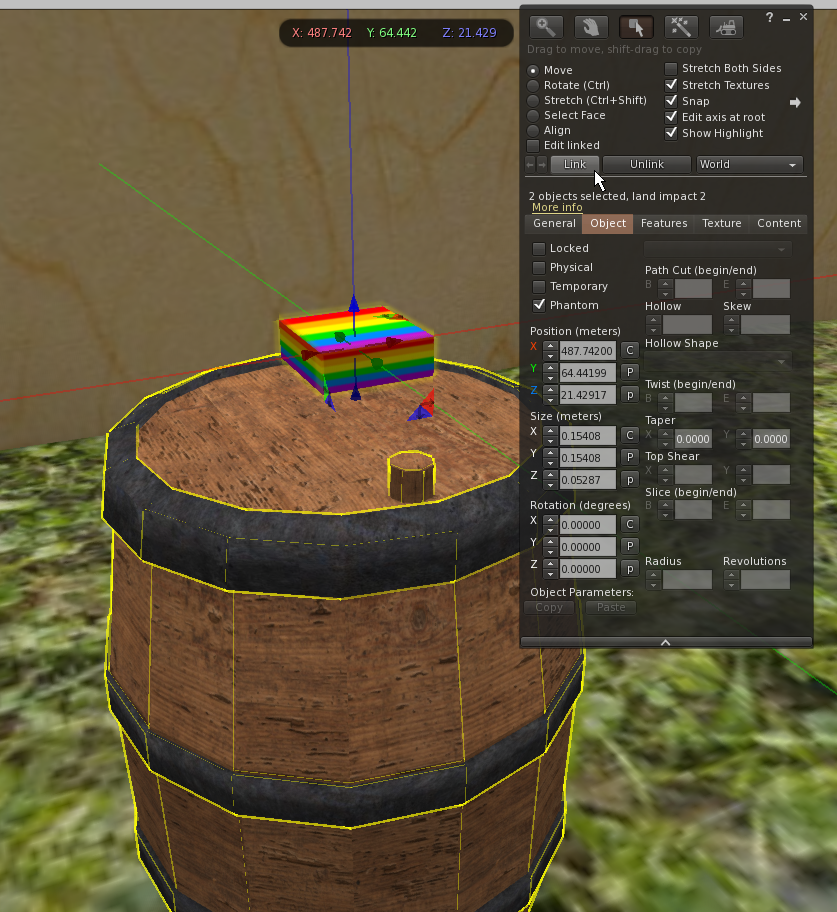
If you have an object made up of more than one prim, you may find that one of them is in the zero position, in which case you could unlink then re-link that prim to make it the root. If that isn’t an option then the solution is to add an extra prim to act as the root. We can set that to have a transparent texture so it won’t show. Note also that any float text appears above the root prim, so that may be another reason that you wish to add the ‘invisible prim’ to your object. Create and position a prim then select your object and then ‘shift select’ the new prim and link them. That way the new prim is the root. Set the prim to have the Transparent texture to hide it.
So now we have our object orientated to look right at the <0, 0, 0> rotation we can turn it into a ‘product’
Products contain three items, a config notecard, a sound and one script. The sound file is optional but adding one does make things more fun!
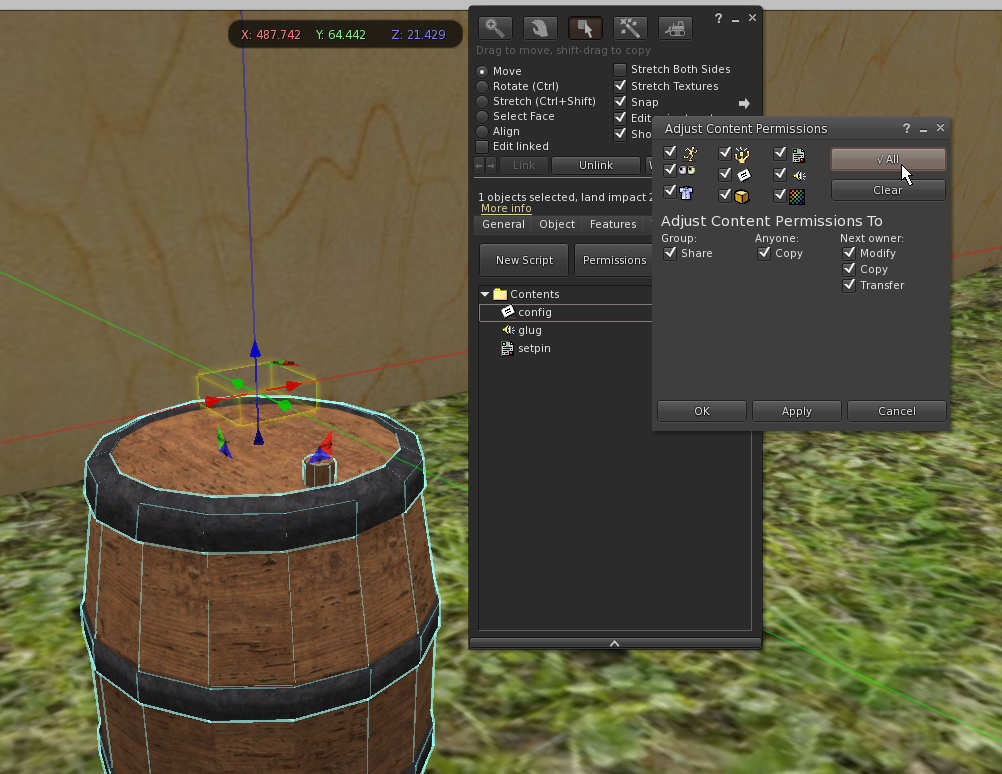
Once you have added the above items you should ensure that all three of them plus the object are set to full perms, as products may not work correctly otherwise.
Click the Permissions button to set it up:
(a) Script
The script is called setpin and is very simple:
// setpin.lsl
default
{

    state_entry()
    {
        llSetText("", ZERO_VECTOR, 0.0);
    }

    on_rez(integer n)
    {
        llSetRemoteScriptAccessPin(999);
    }
}
This script clears any float text on the root prim and sets the object to allow remote installation of scripts. This means that anything that rezzes the product can now insert a copy of the latest product script on rez so your products will always be up to date each time they are rezzed.
(b) Config Notecard
All the configuration items are optional, so you only need to adjust those for you product:
# Number of days before product expires
EXPIRES=7

#(Optional) Some products require some days to mature before they  are ready to  be used (e.g. wine) . How many days to spend in maturation?
#MATURATION=0

#(Optional) Name of target such as Table, Keg store or  avatar  if interacts directly with avatar
#TARGET=SF Table

#(Optional) Extra parameter(s) that will be passed to the HUD
#EXTRAPARAM=Hungry:-5|Thirsty:-5|Drunk:-5|Sick:-5|Energy:55|Health:55|Hygiene:55|Bladder:55

#(Optional) Colour to use for float text. For no float text, use TEXTCOLOR=ZERO_VECTOR
#TEXTCOLOR=<1.0, 1.0, 1.0>

#(Optional) When emptying the product, what color are the particles rezzed?
#FLOWCOLOR=<1.0, 1.0, 1.0>

#(Optional) If present and non-zero, will randomize the colour of prim at primlink specified
#RANDOMIZE=3
TARGET – This allows you to set the product to search for a particular surface when first rezzed and also when set down. See the sections on surfaces for more information.
EXTRAPARAM – This allows you to set parameters that will be sent to the HUD when you use a product. Note however that the HUD first looks in the the DATA_USERVALS notecard and then the VDATA_VALUES notecard and will only use the values in the product if it could not find any in the previous two locations.
You can set one or more from the available options. Setting a negative number will decrease the value of that characteristic so for example -10 for Hungry will reduce your hunger by 10%. Likewise a positive number will increase it. The amount used willl always be 100% when using this method to set the nutrition values.

This work by Buzzy Cnayl is licensed under a Creative Commons Attribution-NonCommercial-ShareAlike 4.0 International License.
Based on a work at https://satyrfarm.github.io/
- Dettagli
- Read Time: 3 mins
(g) Powered water system
If you set your water tower system up based on 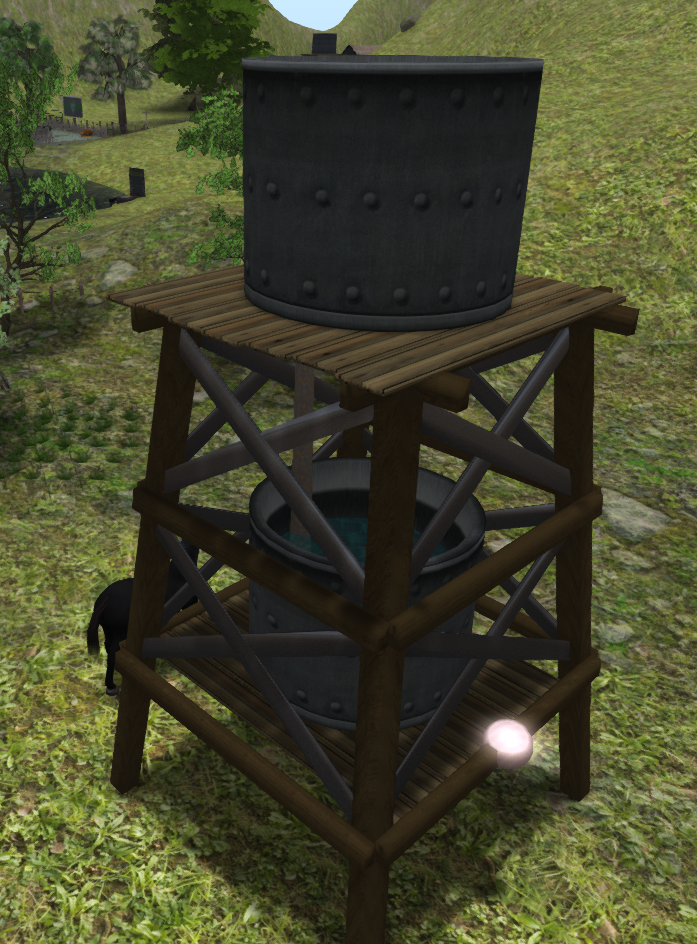 the instructions in the ‘Getting started’ guide, then you will have a system that uses one wind pump to power one water tower. You can instead change things so that the water towers work with the region wide powered water pump, removing the need to have a wind pump next to every water tower.
This way you can place the water towers where they are needed and then you only need to place one electric pump to supply the entire region. When set to use power, the water tower will request the pump to start when the water level drops below around 40%. If there isn't enough energy it will wait and try again later. When the tower is filling with water you will see a green + on the metal ball. The water level may not go much above 60% but that is quite normal.
Normally you should only need one water pump per region , and it uses 1 unit of power to increase the amount of water in any grid enabled water tower by 25% Water towers gives out ONE_PART of water each time a plant or feeder asks and by default that is set at 2%
Changing the configuration
To convert the water tower you just need to edit the config notecard and change it from MODE=WIND to MODE=GRID:
MODE=GRID
SF Electric Pump
This covers an entire region and it will supply water on demand to all Water Tower's configured to GRID mode as long as there is enough energy stored in the grid. The only configuration for the config notecard is to optionally set the default language (touching the pump also gives you the language selection menu).
A new electric pump will start showing ‘Stopped’ with a blue indicator. When a request for water is made to it, assuming there is power in the grid, it will switch to ‘Running’ with a yello indicator. When it finishing pumping water the indicator will show green ‘ONLINE’ If at any point of trying to send water there is not enough power, the pump will show a red ‘STOPPED’ indicator.

This work by Cnayl Rainbow is licensed under a Creative Commons Attribution-NonCommercial-ShareAlike 4.0 International License.
Based on a work at https://satyrfarm.github.io/
- Dettagli
- Read Time: 3 mins
Chapter 6 - Power
(f) Set up Lighting
Light Switch
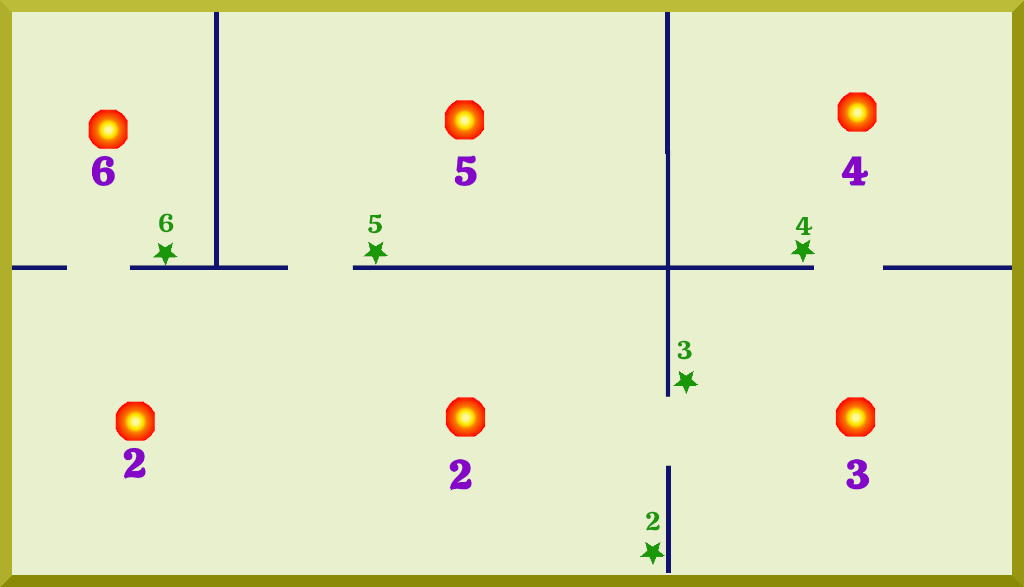
Light switches and lights connect via a channel number. This allows you to match switches to lights.
As an example look at the room layout here. Here we have one bulb and one switch in every room apart from the largest room that has two bulbs and one switch. We set the channel number to be the same (6, 5, 4 etc.) in both the light and in the matching switch. So switch 2 will turn on or off two bulbs, whilst all the other switches just operate one. To set up the channel, edit the confit notecard in the switch and also in the corresponding light(s). As well as the channel there are also other options that you can set as described below:
# Set to 0 for no float text
SHOW_TXT=1
# If set to 1, will turn off lights when no one within range
SENSOR_MODE=0
# Distance to scan (radius in m) if sensor mode is 1
SENSOR_DISTANCE=15
# Set to 1 to auto-connect to region power grid
ON_GRID=1
## What fuel object to accept if not connected to power grid
FUEL_NAME=SF kWh
## All bulbs are set to 0 as default, but change to 1, 2, 3  etc to match switches to light bulbs
CHAN=0
## Default language
LANG=en-GB
Menu options
This will attempt to connect the switch to the region power grid and will then take all the power it requires (assuming the grid has enough reserves) from there.
This will make the system 'self-contained' and it will need manually topping up with SF kWh when the level gets low (like a ‘pay as you’ go system).
If set to auto mode, the light will turn on at night time and off during the day.
In manual mode, light is turned on or off via the switch.
Turn lights on or off. Not shown if in Auto mode or if the switch has no power.
If sensor is active, the light will automatically turn off after around 10 minutes if no avatar is nearby.
Select language
Indicator light
There is a small indicator above the switch that shows the status of the switch.
|
|
No energy |
|
Sensor ON |
|
|
Manual mode |
|
Auto mode |
|
|
Not on Grid |
|
Connected to Grid |
|
COMBINATIONS |
|||
|
|
Not on Grid, Manual mode, Sensor Off |
||
|
|
No energy (not on grid), Manual mode, Sensor Off |
||
|
|
Not on Grid, Manual mode, Sensor On |
||
|
|
No energy (not on grid), Manual mode, Sensor On |
||
|
|
Not on Grid, Auto mode |
||
|
|
No energy (not on grid), Auto mode |
||
|
|
Connected to Grid, Manual mode, Sensor Off |
||
|
|
Connected to Grid, Manual mode, Sensor On |
||
|
|
Connected to Grid, Auto mode |
||
Lightbulbs / Lights
As above you can edit the CONFIG notecard to match the bulb to a switch and can also set other configuration options as shown below:
# Set this to match the CHAN in the light switch
#  0 is the default.
CHAN=0
#
# Brightness of bulb from 1 (minimum) to 10 (maximum)
BRIGHTNESS= 9
#
# Colour of the light
COLOR= <0.9, 0.9, 1.0>
#
# Optional light settings
#    Radius: Specifies how far the light travels, in meters. The maximum is 20 m
#    Falloff:  Sets how quickly the light's Intensity fades as it travels to its outer Radius. Lower values are more gradual. Range is 0.01 to 2.0
RADIUS=20
FALLOFF=0.01
Set the CHAN= value to match the channel for the switch that controls it
You can also set the brightness and colour of the bulb. To find a particular colour (see http://wiki.secondlife.com/wiki/Category:LSL_Color for some examples) In addition there are optional settings for radius and falloff, see http://wiki.secondlife.com/wiki/Category:LSL_Light

This work by Cnayl Rainbow is licensed under a Creative Commons Attribution-NonCommercial-ShareAlike 4.0 International License.
Based on a work at https://satyrfarm.github.io/
- Dettagli
- Read Time: 12 mins
6.1 OVERVIEW
You can extend the Quintopia system with the ability to produce and use power in the form of electricity or gas.
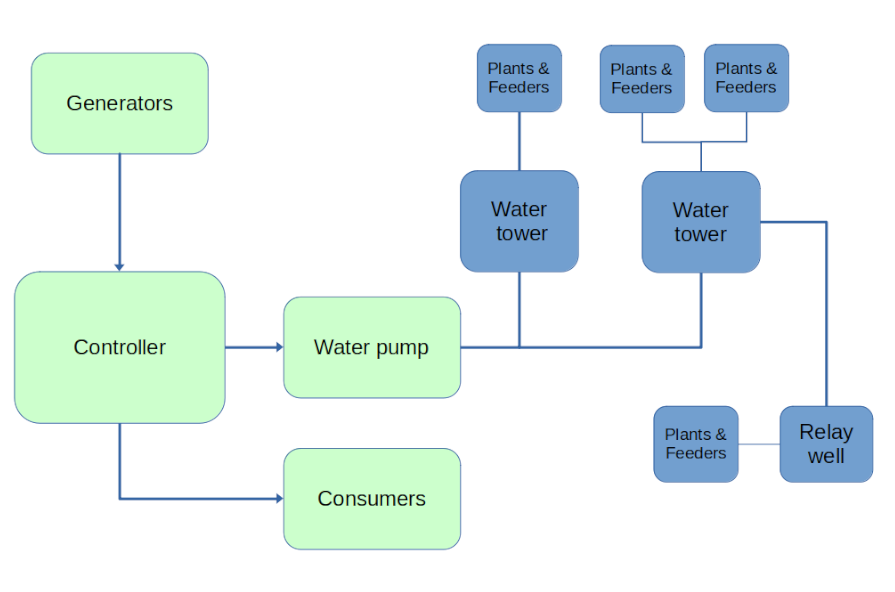
The system consists of "generators" and "consumers" with a central control box and covers an entire region, so you can place items anywhere and they will connect to the ‘region grid’.
You only need one control box for the entire system but you also have the option to limit access to your grid by group, so that more than one system can be operated by different people in the same region.
(a) Controller
This has a range of the entire region so it can be placed anywhere in that region.
It takes in energy produced by generators such as wind turbines etc. and stores that energy ready for any consumer to use.
(b) Generators
You can have as many ‘generators’ of power as you require to provide sufficient energy for your needs. Generators can be placed anywhere in the region and will send their generated energy back to the main controller.
The amount of power that can be obtained depends upon various factors such as the generator type and operating conditions. As an example, wind turbines can produce a lot of energy if placed in good wind conditions. There are also solar panels, generators and even treadmills!
(c) Consumers
Consumers are any item that requires power to operate such as lighting, vehicles, cooker etc. The SF Power Outlet is also a consumer unit that takes power from the grid and then rezzes it as a unit of power (by default SF kWh for electricity and SF Kj for gas). You can then use this in the same way as any other 'produce' item i.e. touch to have it follow you, use as an ingredient, store away etc.
(c) Electric or Gas?
You can choose to run a power grid as either an electrical or a gas system. If you wish you can also have two controllers, one set to electric and one set to gas, in the region. Note that to have more than one controller of each type in a region you will need to make sure they are set to a different groups.
6.2 SETTING UP A POWER GRID
(a) Planning your grid
You need to make sure that you have enough generators to supply the all the consumers in your region. Perhaps the easiest way to create a grid is to start small and monitor power production and consumption and add in extra generators if needed. You can start a grid with the controller ‘pre-charged’ so as to allow you to get everything up and running right away, then just keep an eye on the controller and make sure your grid is not using more power than it is producing.
If you need to add extra generators, do bear in mind that the amount of power generators produce may not be a constant figure as it may depend on other factors such as wind speed, amount of sunlight etc. The controller shows you the average amount of power each generator produces so it is worth waiting at least one day to ensure you are seeing a typical ‘per day average’ figure.
(b) First put out the 'SF Power Controller'
This has a range of the entire region so you can set up a region-wide power grid that will take in and give out energy all over the region. Power controllers (and the generators and consumers) all need to be set to the same group for them to work. To have more than one controller in a region simply make sure they are set to different groups.
You can adjust the settings in your controller by editing the config notecard. For instance, you may wish to start with more than 10kWh of power in the electrical grid or limit the maximum amount of energy stored.
# How much energy to start with on rez/reset
INITIAL_LEVEL=10
# How often (in days) to drop stored level by one part (0 for never)
DROP_TIME=0
# How much one unit of energy
ONE_PART=1
# How far to scan for items (radius in m)
SENSOR_DISTANCE=20
# Offset for rezzing items
REZ_POSITION=<-1.0, 0.0, 0.0>
# Upper limit on storage capacity
MAX_ENERGY=5000
# Below this level, the controller won't allow avatars to take energy directly from it.
MIN_LEVEL=1
# Set to 1 to keep log of consumers, 0 to disable logging
LOGGING=0
# Name of the energy unit (must be in objects inventory)
SF_ENERGY=SF kWh
# Optional name – if set this name will be used instead of showing the region name
NAME=Tesla Grid
# Default language
LANG=en-GB
(c) Next put out one or more generator units
You can use any combination of generators such as the ‘eco’ generators (solar panels, wind turbines, hydroelectric systems) etc. You can place them anywhere in your region so as to make sure they both fit in with the ‘style’ of your region and also they are set to best produce power.
When you rez/copy these, they will start up as offline. This allows you to edit the description for each generator to help you identify it on the controller – right-click the device and select Edit then change the Description to something to help identify the generator on the controller display panel.
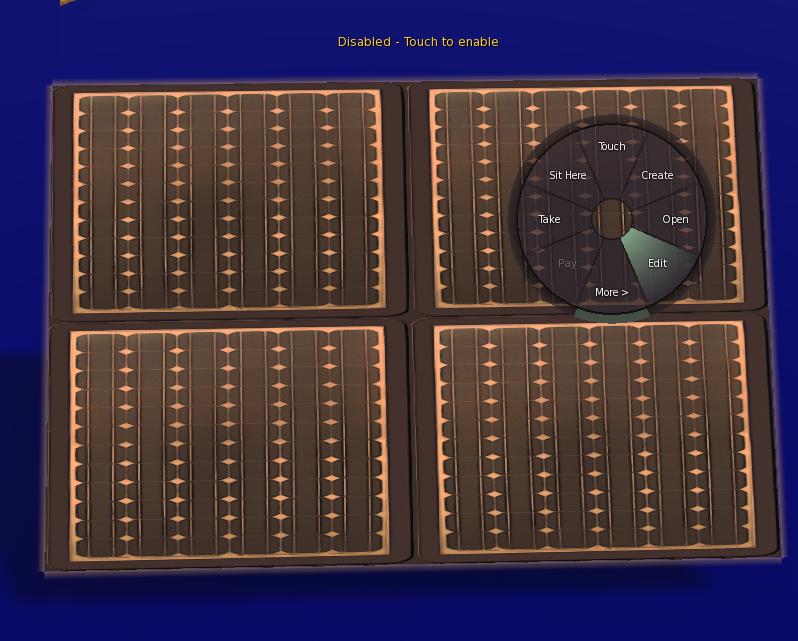
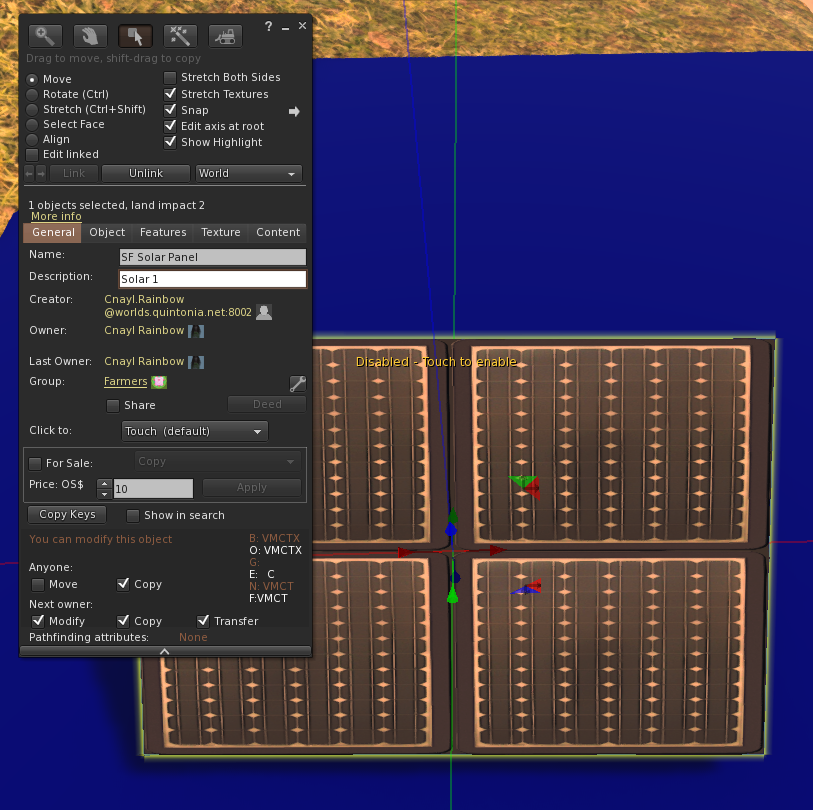
When you have set the description and positioned the generator, just touch to activate it. Touch again to change the language if you haven’t already set that in the config notecard. If you want to reset it or deactivate a generator, you can just set the description to --- and reset the scripts.
Don’t forget to make sure the group is set to be the same as the controller it will be connecting to.
You can place the generators anywhere in the region but be aware that there may location requirements such as the solar panel is best pointed towards where you get the most sun and the hydropower needs to be on/next to water etc.
The config notecard for the ‘eco’ generators has a few basic options:
# Default language
LANG=en-GB
#
# Set the type of generator, TYPE=WIND or TYPE=WATER or TYPE=SUN
TYPE=WATER
#
# Can be Electric or Gas
ENERGY_TYPE=Electric
#
# Set to 0 to not show the status float text
FLOAT_TEXT=1
#
# Colour for the float text if used
COLOR=<1.0, 1.0, 1.0>
#
# Rotation of wheel, CW or CCW (clockwise or counter-clockwise)
DIR=CCW
As mentioned previously you can just put out generators and monitor power consumption versus generated energy and adjust accordingly, however, if you are interested in the technical details you will find it below, otherwise skip down to section d
Solar panel
Around every 10 minutes, they increase their stored charge by power rate/20, and then when their store is greater than 8.0 they send 1 unit of energy to the controller. So if a panel was working at 100% it would be generating 1 unit about every 20 minutes. But in reality, the efficiency will vary depending on the amount of sun and the panel orientation etc. so you would need to look at the average value each one generates (shown on the controller) and work it out from there.
Example: if a panel was running at an average of 40% and set with ONE_PART=1 it would give 1 kWh about every 50 minutes.
Wind turbine
These increase their stored charge by rate/100 about every 10 minutes and will give out 1 unit of energy when that stored charge is above 0.7
Example: if the average rate is above 0.7 and set with ONE_PART=1 then they will generate 1 kWh about every 10 minutes.
Hydroelectric
Assuming it is next to water and so running it will give 1 unit of power about every 30 minutes.
Example: if always running and set with ONE_PART=1 then they will generate 1 kWh about every 30 minutes.
(d) Put out your consumer units
When you have some stored energy reserves you can put out one or more consumer units such as power outlets, chargers, lighting etc.
Power Outlet
The power outlet allows you to get a unit of energy from the grid in the form of the SF kWh. Touch to get the menu and then select Get kWh. You can use this to power things such as the cooker, vehicles etc. and also for the light switch if it is not connected to the grid. You can select to turn off the float text if you prefer a more discrete look by editing the config notecard. As with all electrical items, you should make sure to set the group to match the controller.
SF Charger
When touched, this scans for nearby electrically powered items and lets you select to send an energy charge to it (assuming there is enough power available in the grid).
You can edit the config notecard to configure which items the charger will work with and also the radius that it scans when looking for items:
# Radius in m to look for items
SENSOR_DISTANCE=6
# Items to look for. Remove this line to have the charger list everything it finds
NAMES=SF Vehicle|SF Electric Car|SF Electric Swan
# Language to use for the system
LANG=en-GB
(e) Other Electrical items
Here is information about some of the other electrical items available.
SF Generator
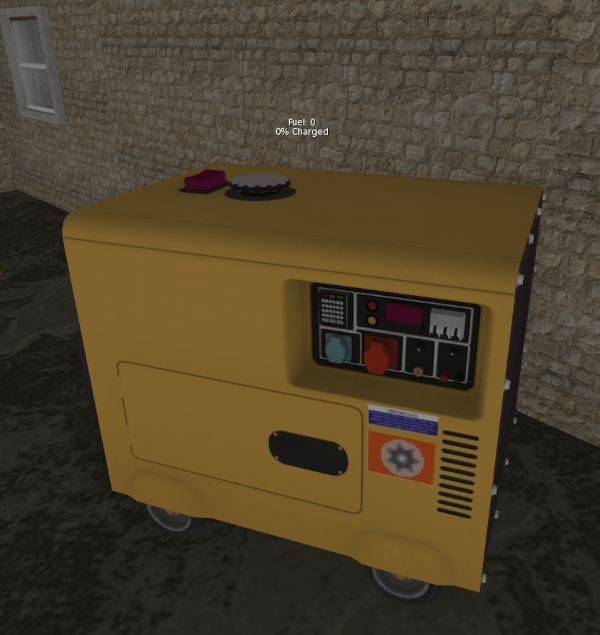 This allows you to generate KWh using various fuels. Because it only operates when you switch it on, rather than on a continuous basis (like the wind turbine etc.) the energy generated shows on the power controller as part of the total kWh count. Because of this, you do not need to edit the description as that is not used as an identifier.
You can set what items are used as fuel by editing the FUEL_LIST section of the config notecard:
# Default language to use
LANG=en-GB
#
# Comma separated list of fuel types that can be used
FUEL_LIST=SF Quethane,SF Oil,SF Fuel,SF Petroleum
#
#  Which fuel item to take from storage (short name)
AUTOFUELITEM=Petroleum
#
# Full name of storage item to get fuel from
FUELSOURCE=SF Fuel Store
#
# Radius to scan for fuel
SENSOR_DISTANCE=10
#
# Set to 1 for exhaust fumes, 0 for none
FUMES=1
#
# Can be  Electric  or  Gas
ENERGY_TYPE=Gas
#
# Set a name for this generator. If not set it will just appear on the Controller as energy units
NAME=Jenny-1
SF Treadmill
This allows you to generate a kWh object - just keep running on the treadmill till you get to 100%! The treadmill also will interact with the HUD if you are wearing it to take energy and give health (along with all the usual things that happen during a workout!)
Note that the treadmill can be used on its own without needing to have a power controller or any other part of the electrical system. This makes it ideal if you just want to have a simple way to get SF kWh without installing the electrical grid.
SF Vehicles
These can be charged either from the SF Charger, or by touching it to add nearby SF kWh. The config notecard allows you to set various options such as auto return home when not in use.

This work by Cnayl Rainbow is licensed under a Creative Commons Attribution-NonCommercial-ShareAlike 4.0 International License.
Based on a work at https://satyrfarm.github.io/
- Dettagli
- Read Time: 5 mins
5.1 INTRODUCTION
(a) Buy and sell with Vivo coins!
The VivoSim Exchange system allows you to buy and sell produce using Vivo coins. When you first link your avatar to your vivosim.net account, you will be credited with 500 coins which you can use to purchase items. You can also sell items for Vivo’s. The exchange can be configured in various ways to fit in with how you wish to trade.
5. 2 SETTING UP
(a) First steps
To use the exchange you will need to have linked your in-world avatar to your vivosim.net account (see the HUD section for information on how to link).
(b) Initialising the exchange
When you rez the VivoSim Exchange (box 12) you will see there are two items - these are the same, just different designs. By default the 'board' Exchange is set to work in Grocery mode and the smaller 'dispensing machine' vendor is set for Hardware mode. You can use one or both of these depending upon your requirements. After a few seconds the exchange should initialise and on the large version you will see the leader board display. If the exchange cannot initialise it will show a red border around the front screen(s) and will try to connect at regular intervals (you can also try using the RESET button). Once active, just click on the exchange to pull up the menu.
Note: the default VivoSim image that is shown on the Exchange should change to thhat of the image you have set on your VivoSim website profile cover .
(c) Options
You can configure the exchange via the Options menu or the config notecard. Note that the options menu is only shown to the owner.
Right click and select Edit, then select the Content tab. Drag your texture from your inventory into the Contents section. You should see the display update. Click the X to close the edit box.
The options menu is available for the owner of the exchange and has the following options.
Toggles between light and dark modes for the display screens
You can control who can use the exchange. The options are:
Everyone: Anyone can use the exchange no matter what group they have set.
Group: Only people who’s active group matches the group of the exchange can use it.
Local: Only avatars on the same grid can use the exchange. They do not have to be a member of the group the exchange is set to.
Trade: The exchange acts as a ‘trading post’ and will keep a tally of what is sold to it, only allowing people to buy those items and quantities and reducing the inventory accordingly.
Normal: The exchange will always allow people to purchase any item from it irrespective of what has been sold to it.
This is the text that appears at the top of the display screen.
This is the text that appears at the bottom of the display screen.
To make it easier to find things, the exchange is set to one of four types which filter what it will buy and sell:
Grocery: All food, drink, harvested items etc.
Hardware: This covers non-food produce such as jewellery, crockery, mining products etc.
Bazaar: Similar to grocery but without prepared food items.
Concessions: This covers all items that are likely to be sold by café's, street food traders etc.
Gorean: Not working yet - will support Gorean products
5.3 USING THE EXCHANGE
(a) Menu items
This will pull up a list of the current prices for all items the exchange can buy and sell in its current mode. Note that the prices are pulled each time from the VivoSim server and so both the items on the list and the prices may change with time.
The exchange will scan for items that it can accept and offer you a menu where you can select items you wish to sell.
This will give you a multi-page menu showing all the items available for purchase. As soon as you click on any of the items, assuming you have sufficient funds for purchase, the item will be rezzed and your Vivo balance will be adjusted.
This tells you your current XP level and also lists recent activity (large screen version of exchange only).
This check the VivoSim server and then tells you your current Vivo's balance.
Sets the language the exchange will operate in.
This button is only visible to the owner. If you are having problems with your exchange not communicating with the VivoSim servers, doing a reset may fix the issues
This menu is only shown to the exchange owner. The various options have been discussed previously.
(b) Trading scenarios
The exchange allows you to buy and sell with the Vivo coin. Vivo's can be used with the exchange system and other items are being added all the time.
Here are some suggested scenarios for using the exchange system.
Market place
You could have several of the exchange units set as shops and allow residents of the region to buy things they needed and sell things they had an excess of.
Trading point
By setting the exchange into Buy/Sell mode you can make a trading point to allow people to specialise in making/growing certain items that they can then trade with others who have a different specialisation.
Street food
By setting the exchange type as concessions you could put one or more street vendors around your village square.
Hoarder
If the thought of having lots of coins appeals to you, then you could set a target and see how well you do in growing your fortune!

This work by Buzzy Cnayl is licensed under a Creative Commons Attribution-NonCommercial-ShareAlike 4.0 International License.
Based on a work at https://satyrfarm.github.io/
- Dettagli
- Read Time: 2 mins
2.8 - TRANSPORTING THINGS
You may recall we mentioned that you should not put produce (i.e. crops, items you have made etc.) into your inventory as doing so will mean they will ‘show as expired when you take them back out of inventory. You know already that if you touch products they will follow you and they can do this even if you fly or teleport, but only so long as you stay in the same region (if a product tries to follow you across a region crossing it will expire and die).
So you may be wondering if it’s possible to take food with you when you go travelling, or to trade your farm produce with others. In fact there are several possibilities opens to you.
(a) Network store
There are several designs of the network store system such as the SF Cart and also the SF Backpack (the backpack is part of the HUD package but you can use it without the HUD)
Network storage items allows you to store and then retrieve any product . It stores your inventory of items both locally and also on the Quintonia server so you can take the item (e.g. SF Backpack) in and out of inventory and it will re-load your last saved stock each time.
Because you wear it, it will allow you to put it on in most places. You will need to have the right to run scripts in any place you wish to add items to it. If you wish to pull items out of the backpack you will also need build rights in that location.
(b) Provisions
Suppose you are going to visit a location that won’t allow you to rez things but you know you will need to eat and drink there. In that case (assuming you can run scripts – if you can’t then your HUD won’t work anyway!) you can use the ‘provisions box’ feature of the HUD. This allows you to store any food, drink, booze etc. and they are kept as units of food or drink and so on. You can then select to use them when you need to. You will find more information about this in the chapter about the HUD.
(c) Exchange
The Quintonia Exchange allows you to buy and sell produce using the ‘currency’ of Quinto’s (ϙ) The exchange can be set to allow buying and selling anything, or if you prefer to make it more like a trading station you can set it to only allow people to buy items that have previously been sold to it. You will find more information in the Exchange chapter.

This work by Buzzy Cnayl is licensed under a Creative Commons Attribution-NonCommercial-ShareAlike 4.0 International License.
Based on a work at https://satyrfarm.github.io/
- Dettagli
- Read Time: 4 mins
2.7 - Life cycles: Plants
(a) Empty (Fallow)
Fields, planters etc. start off empty, ready for you to plant something. Note that depending upon the settings, some items will not go back to empty after harvest, but instead automatically replant and start again. When you select Plant from the items menu, you will see the list of available plants. The selection can range from many plants to just one, depending upon the item.
(b) New
After planting, you may want to turn on one or both of Auto Water and Auto Harvest. Note that if you turn on auto harvest it will harvest the crop when ready and then re-plant the same item. For plants that automatically start back in the new stage after harvest, you have the option to do a Cleanup at any point during the New stage, should you wish to change the crop.
(c) Growing
After a short while at 100% New, the plant will move from to the growing stage. If you wish to speed the growing process, you will find there is now a menu option to add some manure. One load of manure will reduce the time it takes to get ripe by around 1 day. Just like in real life, (if you are wearing the HUD with the health mode turned on) you will use energy and get a bit dirty for each load of manure you add. You will, though, increase your health.
(d) Ripe
Once ripe, you can harvest the plant. If you are manually harvesting, you can choose to do this at any time between 0% and 100% ripe. You may want to harvest right away or if you have a lot of ripe items you may wish to wait a while for some of them to spread out the collection. If you don’t harvest in time the plant will die, unless it is set to automatically replant, in which case it will simply go from ripe to new, and you will miss out on getting any crop.
(e) Dead
If a plant does not get enough water, or if it isn’t harvested in time (see above) it will die. Once a plant is dead, you must clean it up before it can be replanted. Note that if you are using the NPC Farmer system, the farmer can’t clean up dead items, so you must do this before they will be able to tend that crop again. Selecting Cleanup from the plants menu will remove the dead plant, set it to the New stage, and give you a bucket of compostable material. Compostable buckets only last a day, so don’t forget to put it on the compost heap!
(f) By-products
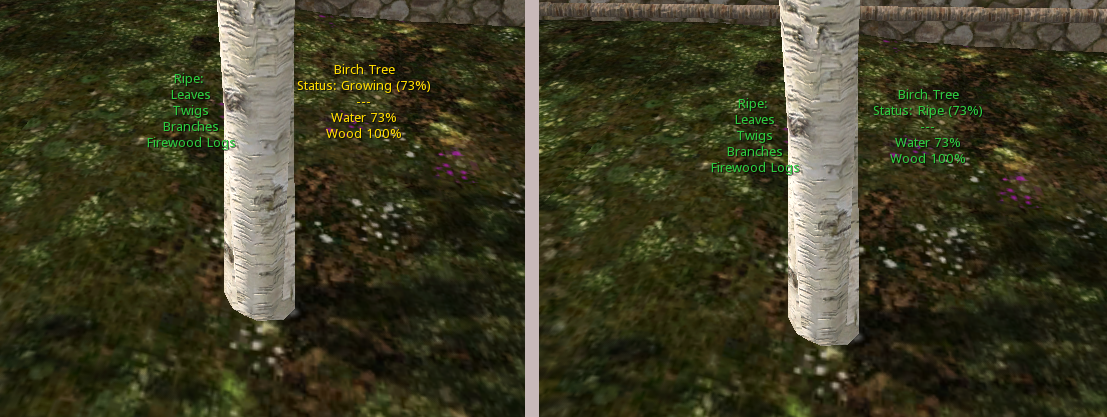
Some plants and trees also produce by-products during their growing cycle. This can be things like leaves, twigs etc. These become available as the plant grows and are shown in separate float text than the main plant information. Below left shows that for this tree, the leaves, twigs, branches & firewood logs are all available to collect. You can also collect the Wood item as it is at 100%. Once the actual tree is ripe (see right image) you can then use the Harvest button to collect the main product.

This work by Buzzy Cnayl is licensed under a Creative Commons Attribution-NonCommercial-ShareAlike 4.0 International License.
Based on a work at https://satyrfarm.github.io/
- Dettagli
- Read Time: 2 mins
2.6 - Life cycles: Animals
(a) Birth
Where do babies come from?! Well you know one way, we can use the magic of the animal rezzer to make them appear and to have some control over their sex. But for a more ‘real’ experience, we can mate our animals to get them pregnant or to lay eggs (depending upon which animal it is). But we can’t (of course!) mate animals until they are adults – so some patience is needed but also it’s part of the fun of watching the animal grow up. When an animal is first born/rezzed, its 'home' location is set at the coordinates of where it is rezzed.
(b) Childhood
When an egg hatches or an animal is born, it is just a child and so starts off small. During childhood animals eat, drink and grow. Animals typically spend 15% of their life as children.
(c) Adult
When an animal becomes an adult it will start producing items such as manure, wool, feathers etc. You can find out what each animal gives by selecting the Info option in the animal menu. As adults, you can mate the animals (they are well behaved and won’t mate without your telling them to!) Just select the Mate option from the menu on the female animal. There needs to be an adult male within range (you can see the animal range from the Options menu). Once mated the animal will go through pregnancy or lay an egg depending upon the animal. The Info button on animals gives you information on how long it takes for eggs to hatch or how long pregnancy lasts. Once a female has laid an egg or given birth once it will then start producing eggs or milk.
(d) Death
Hopefully, your animals will live a full and happy life. But eventually, they will get old and die. You can see how long their life expectancy is from the Info menu on the animal. Note that it shows an average life expectancy – some will live a little longer than that, some a little less. Such is life! Some animals will give meat and skin (or equivalent) when they die. In addition to dying of old age, animals can die prematurely from starvation or thirst so do keep an eye on them to make sure they are getting enough to eat and drink. A dead animal will stay where it died until someone comes along and clears it up. If you are the owner of the animal you can touch the corpse to send it along its way across the ‘rainbow bridge’ (if you are wearing your HUD you will get some health points for performing this final act).
(e) Butchery
Once adult, animals can also be butchered (Options menu then select Butcher) to get any meat and skin products. Note that butchery won’t leave you with a corpse.

This work by Buzzy Cnayl is licensed under a Creative Commons Attribution-NonCommercial-ShareAlike 4.0 International License.
Based on a work at https://satyrfarm.github.io/


