Chapter 9 - Storage Wells & Irrigation
We have used the SatyrFarm Well and also the SF Water tower – these are both examples of the ‘storage well’ system. Items in this system gradually fill up and store one specific product and as long as the level is greater than the ‘one part’ setting you can take some of the product. For the SatyrFarm well it was water but we also can get rennet from the SF Rennet Container, yeast from the SF Yeast Container and sea water from the SF Sea Water pump etc.
There are various configuration options to allow you to put some restrictions on the system by specifying how the item functions. For example you can set that it needs to be close to something in order for the level to increase. You can specify an actual item or set it that it needs to be at sea level – the SF Sea Water pump is an example of the latter. We can also specify what ‘energy’ drives it and we can specify wind (like the first water tower we used that require a wind pump near them), grid (like the example shown in the section on electricity for setting water towers to use the grid), or ‘self’ (such as the SatyrFarm well)
	# Level to start at on rez/hard reset
	INITIAL_LEVEL=10
	#
	# What liquid is this system for
	LIQUID=Water
	#
	# How much to increase/decrease level by for one 'serving'
	ONE_PART=2
	#
	# How many days before level drops 1 part ('evaporation')
	DROP_TIME=2
	#
	# Offset to rez water buckets
	REZ_POSITION=<1.0, 0.5, 0.0>
	#
	# Set to 0 to disable menu and just rez product on touch
	MENU_MODE=0
	#
	# Set to 0 if you don't want to allow adding SF_WATER item via menu to top up level
	ACCEPT_PRODUCT=0
	#
	# Can be WIND, GRID, SELF or RELAY which relates to using Wind powered water pump, Electric pump, built in system or via another nearby storage-well
	MODE=RELAY
	#
	# In RELAY mode, where to get water from
	RELAY_WELL=SF Water Tower
	#
	# Set to 1 for clouds, rain and other effects
	WEATHER=1
	#
	# If WEATHER=1 set the range of the rain in m
	RAIN_RADIUS=35
	#
	# How often in seconds to increase level by ONE_PART if MODE=SELF
	WATERTIME=600
	#
	# SEA_LEVEL forces it to be at sea level to work. Can also specify item to scan for or remove/comment out if not needed
	REQUIRES=SEA_LEVEL
	#
	# radius in m to scan for REQUIRES item
	RANGE=6
	#
	# Default language
	LANG=en-GB
(A) Examples of the various settings
LIQUID=
This is the item that is produced such as water, sea water, yeast etc. If this item is not in the contents as a product (e.g if LIQUID=Water the the product is SF Water) the system will check with storage locations to try and find a copy and if it is unable to find it then it will show on float text that it needs that item.
MENU_MODE=
If set to 1 then menu mode is enabled and touching the item will give you a menu. If set to 0 this disables the menu and touching immediately rezzes the product. If you are using the NPC Farmer then the item that it uses to fetch water must be set this way.
ACCEPT_PRODUCT=
If menu mode is active, you can enable or disable the option to allow you to top up the storage well via the ‘Add’ button
MODE=
The options are WIND which requires an SF Wind Pump nearby, GRID which allows it to take power from the electricity grid, RELAY which allows you to link wells together and SELF which means it does not require energy.
REQUIRES=
If you enter SEA_LEVEL then the Z height position should be near to the regions Water Height setting in order for it to operate.
You can also specify the name of something that needs to be close to the well for it to work. As an example you may decide that for producing yeast, the well needs to be close to the SatyrFarm Distillery so you would edit the notecard to have the line:
REQUIRES=SatyrFarm Distillery
If you do not require anything for operation, just remove or comment out the REQUIRES= line
WEATHER=
Setting this to 1 will enable anyweather or other special effects system. You can find more information on creating your own weather and effects systems in chapter 13.9
9.1 IRRIGATION
Plants, animals and mining all require water. There are various ways to get the water to where it is needed and you can use one or a combination of the following:
(A) Manual watering
You take water from any of the storage wells that are set to give water. As the SF Water is product, you can touch it and have it follow you as you go to the item that requires water. Don’t forget you can have more than one bucket follow you but don’t get to ambitious – 4 or 5 is probably a good maximum! You can also use one of the watering carts if you don’t fancy to much walking!
Manual water means you don’t need to have any storage wells near things but you do need to keep an eye on water levels, as if they get to low for to long plants and animals may die on you!
(B) NPC Farmer watering
The NPC farmer can be used to water plants and animal feeders. You need to ensure that there is a storage well within the farmers range that has menu mode disabled, since the farmer expects to just touch it to get the water.
NPC farmers visit items on a relatively random basis and only know if to water an item when they visit it, so if you have too many items for the NPC to manage it may miss items that are in desperate need of water!
(C) Auto watering
Anything that needs water has an ‘auto’ option. Turning this on means the item will look to automatically get water from the closest source. Check the config notecard to see if there is an option to set the source, if not then it will be looking for a storage well called SF Water Tower The limit for searching is a 96m radius. Note also that if the closest storage-well found is not in the same group as the thing requesting it, an error message is given. If you have plants, animal feeders etc. That are close to a neighbours water towers, you may see this error message and then need to either move your items or put a water source closer to them.
Generally the water level can get quite low before the plant, feeder etc. Calls for more water. If you have to many items trying to get water from the one storage well then it’s possible the well may not be able to fill up quickly enough to meet the demand, and so you should keep an eye on how much things use.
As we have seen there are various ways to configure these water towers:
Wind mode
The ‘SF Wind Pump’ will start gradually filling with water after it is first rezzed and when it gets to 100% (about 2 hours from a fresh rez) it sends one portion of water to the closest item called “SF Water Tower” (note though that the maximum distance between the two can be no more than 96m) The wind pump will now continue to send one portion at regular intervals (approx 15-20 minutes)
If the demand on the water tower is too high it may run out of water before the next load is sent from the pump. A wind pump can only supply one water tower.
Grid mode
When the water level in a grid mode storage-well drops below about 40% it will send a request to the regional (electric) water pump for more water. The pump first checks there is enough power in the grid and if so will start and send water to the requesting storage-well.

Relay mode
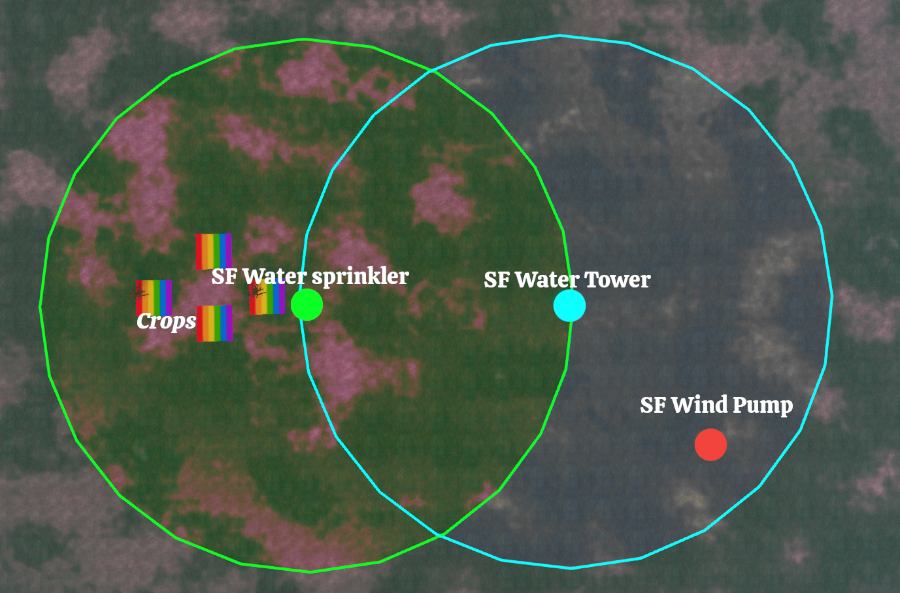
In relay mode you can set one storage well to get water from another storage well. As an example you could put out some SF Water sprinklers near your plants and set the plants to get their water from the sprinklers. Then you set the sprinklers to get their water from the SF Water Tower.
The blue circle shows the range of the main water tower and the green circle is the range of the water sprinkler. You could add more sprinklers anywhere in the blue circle to extend the range even further.


