Chapter 6 - Power
You can extend the VivoSim system with the ability to produce and use power in the form of electricity or gas.
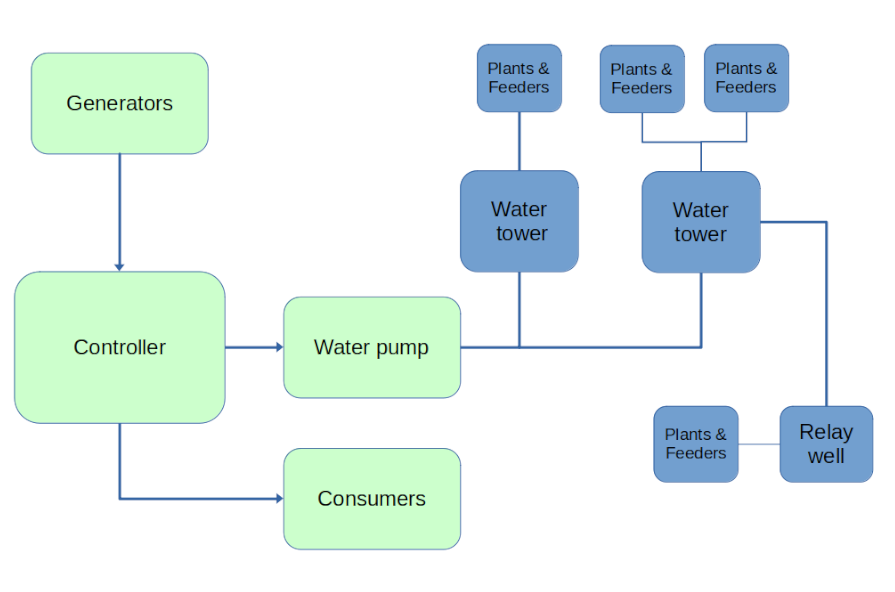
The system consists of "generators" and "consumers" with a central control box and covers an entire region, so you can place items anywhere and they will connect to the ‘region grid’.
You only need one control box for the entire system but you also have the option to limit access to your grid by group, so that more than one system can be operated by different people in the same region.
(a) Controller
This has a range of the entire region so it can be placed anywhere in that region.
It takes in energy produced by generators such as wind turbines etc. and stores that energy ready for any consumer to use.
(b) Generators
You can have as many ‘generators’ of power as you require to provide sufficient energy for your needs. Generators can be placed anywhere in the region and will send their generated energy back to the main controller.
The amount of power that can be obtained depends upon various factors such as the generator type and operating conditions. As an example, wind turbines can produce a lot of energy if placed in good wind conditions. There are also solar panels, generators and even treadmills!
(c) Consumers
Consumers are any item that requires power to operate such as lighting, vehicles, cooker etc. The SF Power Outlet is also a consumer unit that takes power from the grid and then rezzes it as a unit of power (by default SF kWh for electricity and SF Kj for gas). You can then use this in the same way as any other 'produce' item i.e. touch to have it follow you, use as an ingredient, store away etc.
(c) Electric or Gas?
You can choose to run a power grid as either an electrical or a gas system. If you wish you can also have two controllers, one set to electric and one set to gas, in the region. Note that to have more than one controller of each type in a region you will need to make sure they are set to a different groups.
6.1 SETTING UP A POWER GRID
(a) Planning your grid
You need to make sure that you have enough generators to supply the all the consumers in your region. Perhaps the easiest way to create a grid is to start small and monitor power production and consumption and add in extra generators if needed. You can start a grid with the controller ‘pre-charged’ so as to allow you to get everything up and running right away, then just keep an eye on the controller and make sure your grid is not using more power than it is producing.
If you need to add extra generators, do bear in mind that the amount of power generators produce may not be a constant figure as it may depend on other factors such as wind speed, amount of sunlight etc. The controller shows you the average amount of power each generator produces so it is worth waiting at least one day to ensure you are seeing a typical ‘per day average’ figure.
(b) First put out the 'SF Power Controller'
This has a range of the entire region so you can set up a region-wide power grid that will take in and give out energy all over the region. Power controllers (and the generators and consumers) all need to be set to the same group for them to work. To have more than one controller in a region simply make sure they are set to different groups.
You can adjust the settings in your controller by editing the config notecard. For instance, you may wish to start with more than 10kWh of power in the electrical grid or limit the maximum amount of energy stored.
# How much energy to start with on rez/reset
INITIAL_LEVEL=10
# How often (in days) to drop stored level by one part (0 for never)
DROP_TIME=0
# How much one unit of energy
ONE_PART=1
# How far to scan for items (radius in m)
SENSOR_DISTANCE=20
# Offset for rezzing items
REZ_POSITION=<-1.0, 0.0, 0.0>
# Upper limit on storage capacity
MAX_ENERGY=5000
# Below this level, the controller won't allow avatars to take energy directly from it.
MIN_LEVEL=1
# Set to 1 to keep log of consumers, 0 to disable logging
LOGGING=0
# Name of the energy unit (must be in objects inventory)
SF_ENERGY=SF kWh
# Optional name – if set this name will be used instead of showing the region name
NAME=Tesla Grid
# Default language
LANG=en-GB
(c) Next put out one or more generator units
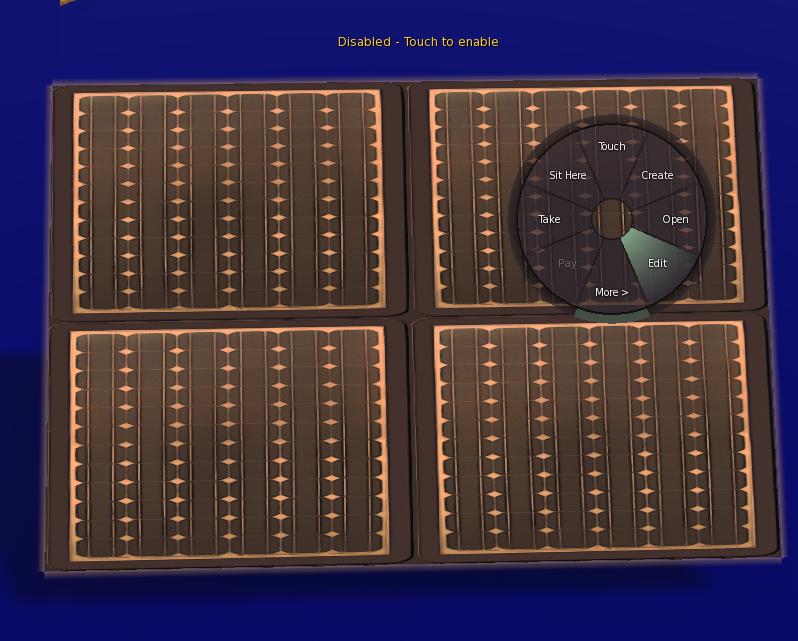
You can use any combination of generators such as the ‘eco’ generators (solar panels, wind turbines, hydroelectric systems) etc. You can place them anywhere in your region so as to make sure they both fit in with the ‘style’ of your region and also they are set to best produce power.
When you rez/copy these, they will start up as offline. This allows you to edit the description for each generator to help you identify it on the controller – right-click the device and select Edit then change the Description to something to help identify the generator on the controller display panel.
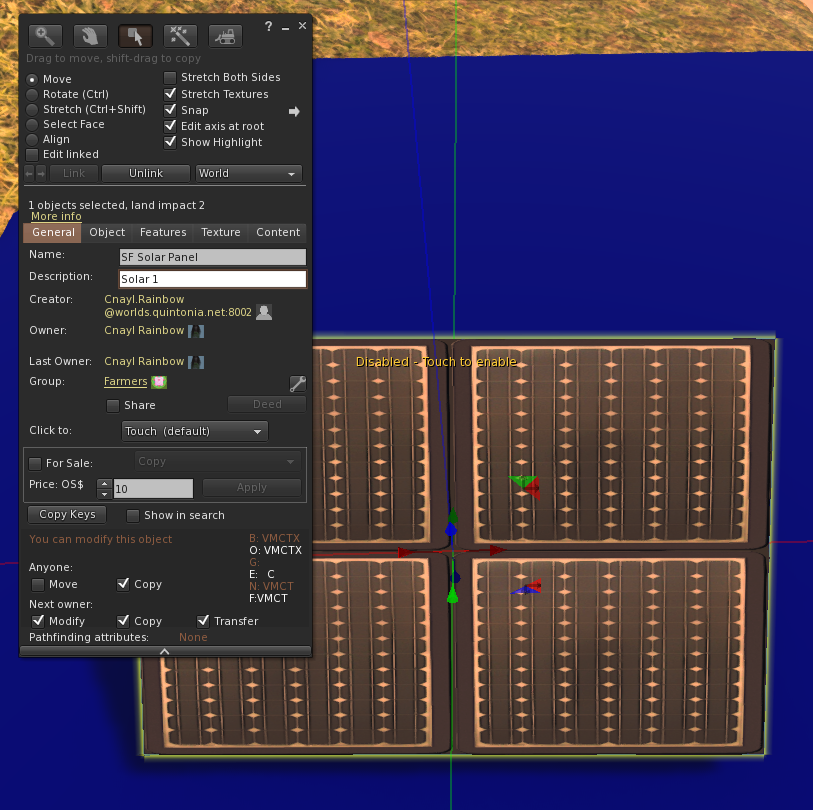
When you have set the description and positioned the generator, just touch to activate it. Touch again to change the language if you haven’t already set that in the config notecard. If you want to reset it or deactivate a generator, you can just set the description to --- and reset the scripts.
Don’t forget to make sure the group is set to be the same as the controller it will be connecting to.
You can place the generators anywhere in the region but be aware that there may location requirements such as the solar panel is best pointed towards where you get the most sun and the hydropower needs to be on/next to water etc.
The config notecard for the ‘eco’ generators has a few basic options:
# Default language
LANG=en-GB
#
# Set the type of generator, TYPE=WIND or TYPE=WATER or TYPE=SUN
TYPE=WATER
#
# Can be Electric or Gas
ENERGY_TYPE=Electric
#
# Set to 0 to not show the status float text
FLOAT_TEXT=1
#
# Colour for the float text if used
COLOR=<1.0, 1.0, 1.0>
#
# Rotation of wheel, CW or CCW (clockwise or counter-clockwise)
DIR=CCW
As mentioned previously you can just put out generators and monitor power consumption versus generated energy and adjust accordingly, however, if you are interested in the technical details you will find it below, otherwise skip down to section d
Solar panel
Around every 10 minutes, they increase their stored charge by power rate/20, and then when their store is greater than 8.0 they send 1 unit of energy to the controller. So if a panel was working at 100% it would be generating 1 unit about every 20 minutes. But in reality, the efficiency will vary depending on the amount of sun and the panel orientation etc. so you would need to look at the average value each one generates (shown on the controller) and work it out from there.
Example: if a panel was running at an average of 40% and set with ONE_PART=1 it would give 1 kWh about every 50 minutes.
Wind turbine
These increase their stored charge by rate/100 about every 10 minutes and will give out 1 unit of energy when that stored charge is above 0.7
Example: if the average rate is above 0.7 and set with ONE_PART=1 then they will generate 1 kWh about every 10 minutes.
Hydroelectric
Assuming it is next to water and so running it will give 1 unit of power about every 30 minutes.
Example: if always running and set with ONE_PART=1 then they will generate 1 kWh about every 30 minutes.
(d) Put out your consumer units
When you have some stored energy reserves you can put out one or more consumer units such as power outlets, chargers, lighting etc.
Power Outlet
The power outlet allows you to get a unit of energy from the grid in the form of the SF kWh. Touch to get the menu and then select Get kWh. You can use this to power things such as the cooker, vehicles etc. and also for the light switch if it is not connected to the grid. You can select to turn off the float text if you prefer a more discrete look by editing the config notecard. As with all electrical items, you should make sure to set the group to match the controller.
SF Charger
When touched, this scans for nearby electrically powered items and lets you select to send an energy charge to it (assuming there is enough power available in the grid).
You can edit the config notecard to configure which items the charger will work with and also the radius that it scans when looking for items:
# Radius in m to look for items
SENSOR_DISTANCE=6
# Items to look for. Remove this line to have the charger list everything it finds
NAMES=SF Vehicle|SF Electric Car|SF Electric Swan
# Language to use for the system
LANG=en-GB
(e) Other Electrical items
Here is information about some of the other electrical items available.
SF Generator
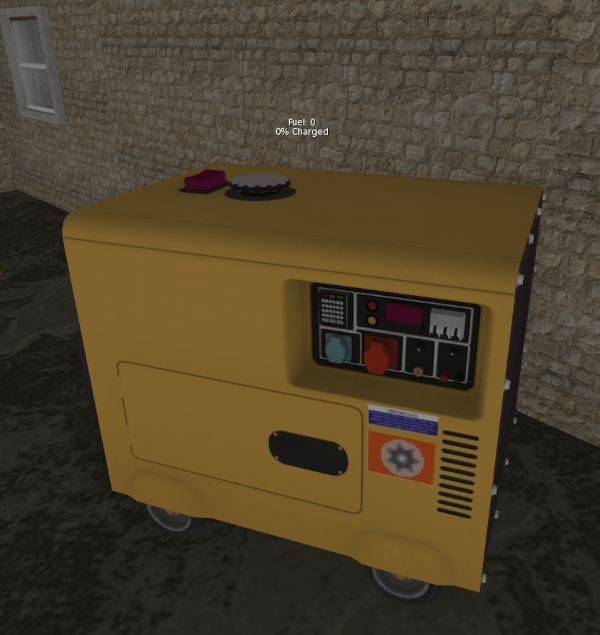 This allows you to generate KWh using various fuels. Because it only operates when you switch it on, rather than on a continuous basis (like the wind turbine etc.) the energy generated shows on the power controller as part of the total kWh count. Because of this, you do not need to edit the description as that is not used as an identifier.
You can set what items are used as fuel by editing the FUEL_LIST section of the config notecard:
# Default language to use
LANG=en-GB
#
# Comma separated list of fuel types that can be used
FUEL_LIST=SF Quethane,SF Oil,SF Fuel,SF Petroleum
#
#  Which fuel item to take from storage (short name)
AUTOFUELITEM=Petroleum
#
# Full name of storage item to get fuel from
FUELSOURCE=SF Fuel Store
#
# Radius to scan for fuel
SENSOR_DISTANCE=10
#
# Set to 1 for exhaust fumes, 0 for none
FUMES=1
#
# Can be  Electric  or  Gas
ENERGY_TYPE=Gas
#
# Set a name for this generator. If not set it will just appear on the Controller as energy units
NAME=Jenny-1
SF Treadmill
This allows you to generate a kWh object - just keep running on the treadmill till you get to 100%! The treadmill also will interact with the HUD if you are wearing it to take energy and give health (along with all the usual things that happen during a workout!)
Note that the treadmill can be used on its own without needing to have a power controller or any other part of the electrical system. This makes it ideal if you just want to have a simple way to get SF kWh without installing the electrical grid.
SF Vehicles
These can be charged either from the SF Charger, or by touching it to add nearby SF kWh. The config notecard allows you to set various options such as auto return home when not in use.